In the era of “Software that’s eating the world”, where each step you take at work has its own tool, the biggest challenge every team is facing is how to make them work together. And the ones who have to tackle the challenge are often Salesforce admins. Being one myself, I know this first hand.
While the “integrate them all” would be too big of a subject to cover in one article, integrating the 2 of them is right on target. As they say, Rome didn’t get build in a day. So today we will focus on building a bridge between the Video Calls and Salesforce.
Or to be more specific, how to turn your video calls into follow up tasks and automatic field updates.
-
Step 1: Choose the right video tool
If you are not a newbie to Salesforce, it won’t come as a surprise that as customizable and add-ons rich as Salesforce might be it doesn’t offer an out of the box video calling tool. So the first step is to pick one that provides the out of the box integration with Salesforce.
I tested 3 of them and you may take your pick:
- Zoom
- Bonjour.io
- Demodesk
The below guide will focus on the second listed, as it’s the other too only log the event occurrence. In contrast, Bonjour.io lets you sync the notes that were taken during the call, that would be the main element to set the automation.
If you aren’t using it yet you can – get it here
STEPS TO FOLLOW
- Request Access
- Install the app
- Follow the steps to authorize your devices in the Mac Settings
- You are all set

-
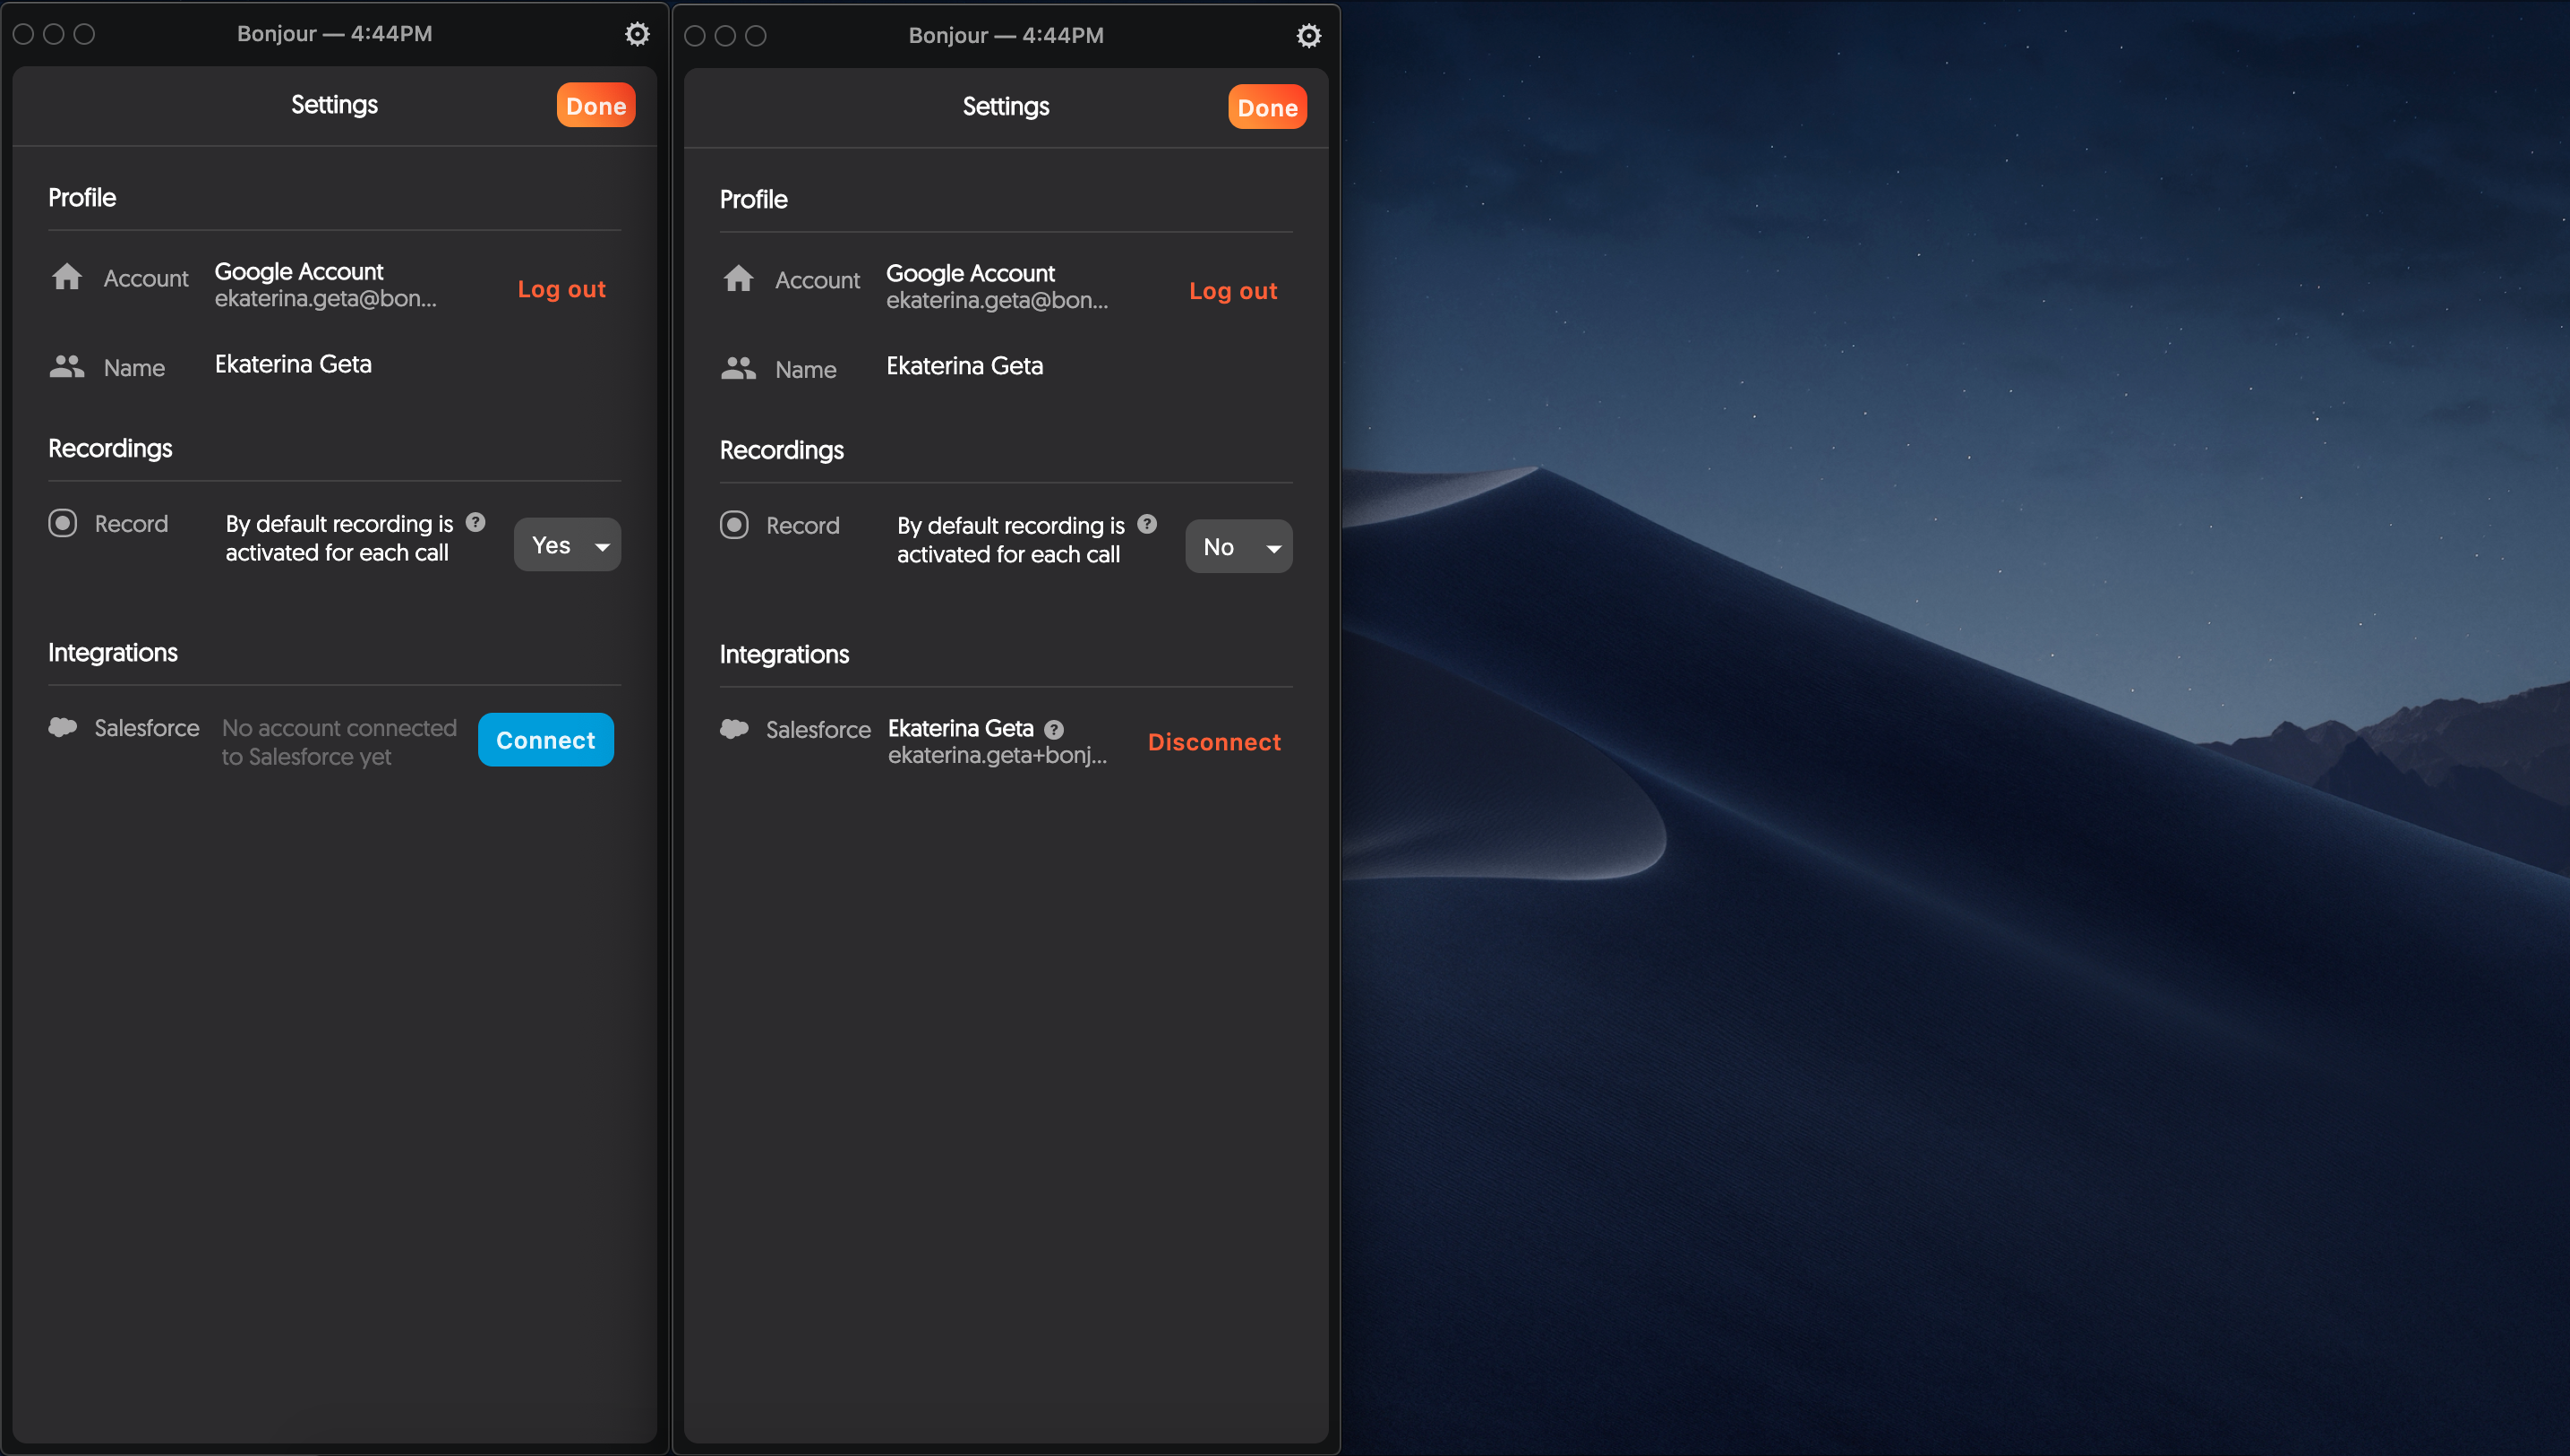
Step 2: Connect your Salesforce
As I mentioned above the connection process is very simple – you’re done in 10 min and only 3 clicks.
Note: this time can be longer in you have more than 30K records in Salesforce but never more than 30 min.
STEPS TO FOLLOW
- Click on the Settings icon in the top right corner
- In the Integrations section, click connect
- You will be redirected to the standard Salesforce login page
- Fill in the Username and Password
- Click allow in the next step
- Back in the app – you should now see your username and disconnect button -> meaning that it’s all good to go
-
Step 3: Prepare your Notes template & Map them to Salesforce
This step is pen & paper one. Before we setup an automation we first need to decide what do we want the end result to look like. For our example, we will update the CRM and Contact status.
STEPS TO FOLLOW
- Setup the Notes template that you will reuse for all the calls
- Map out the Text to Fields
1) Setup the Notes template that you will reuse for all the calls
Our notes would include 2 questions:
Which CRM do you use?
- Salesforce
- Hubspot
- Pipedrive
Which calendar tool do you use?
- Calendly
- Chili piper
- GoogleAgenda
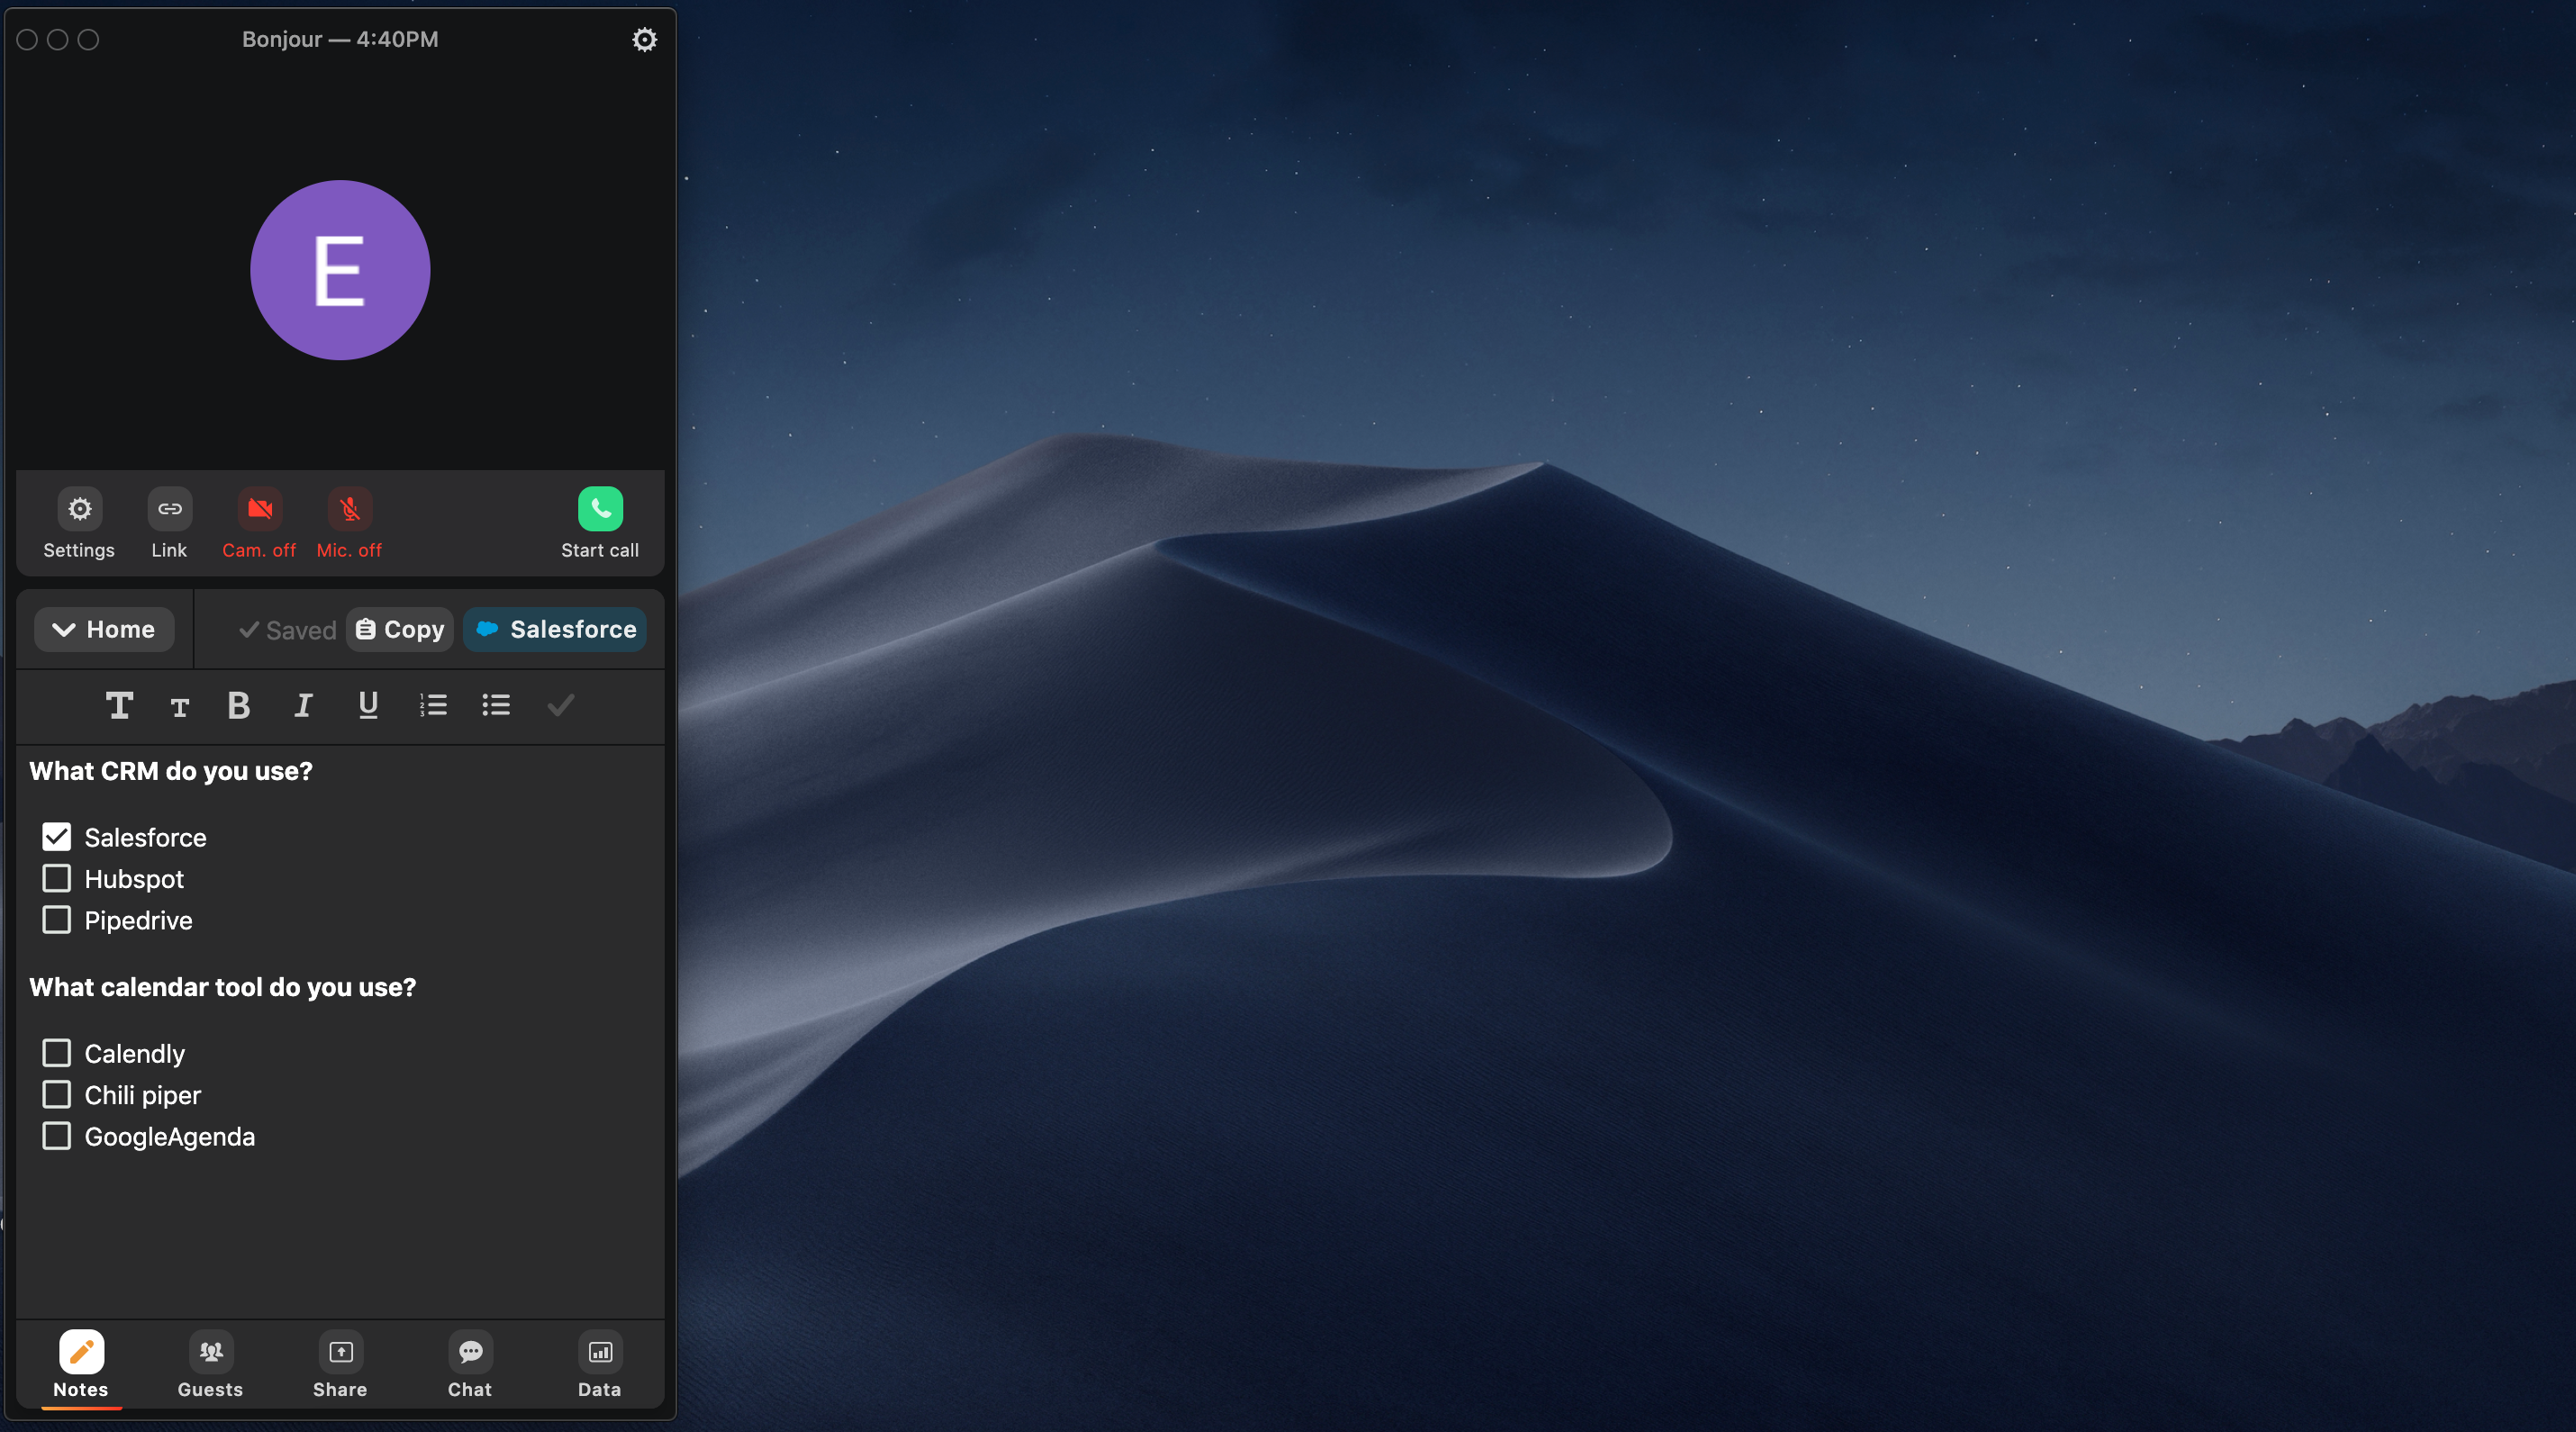
2) Map out the Text to Fields
Which CRM do you use? –> Contact Object – CRM__c
Which calendar tool do you use? –> Contact Object – Calendar_tool__c

In our examples those fields are the picklist field, so we need to make sure that you have the corresponding the values on the right have a corresponding value on the left
-
Step 4: Test your integration
Before we start the Process builder setup, let’s see how the integration works and what in the end result and the format of the notes that land in Salesforce.
STEPS TO FOLLOW
- Click “Instant call”
- Start Call
- Paste the Note templates that we created earlier
- End Call
- Click Salesforce button
- Search for Andy – Select Andy Young – Contact
- Click “Save to Salesforce”
- Click “See updates in Salesforce”

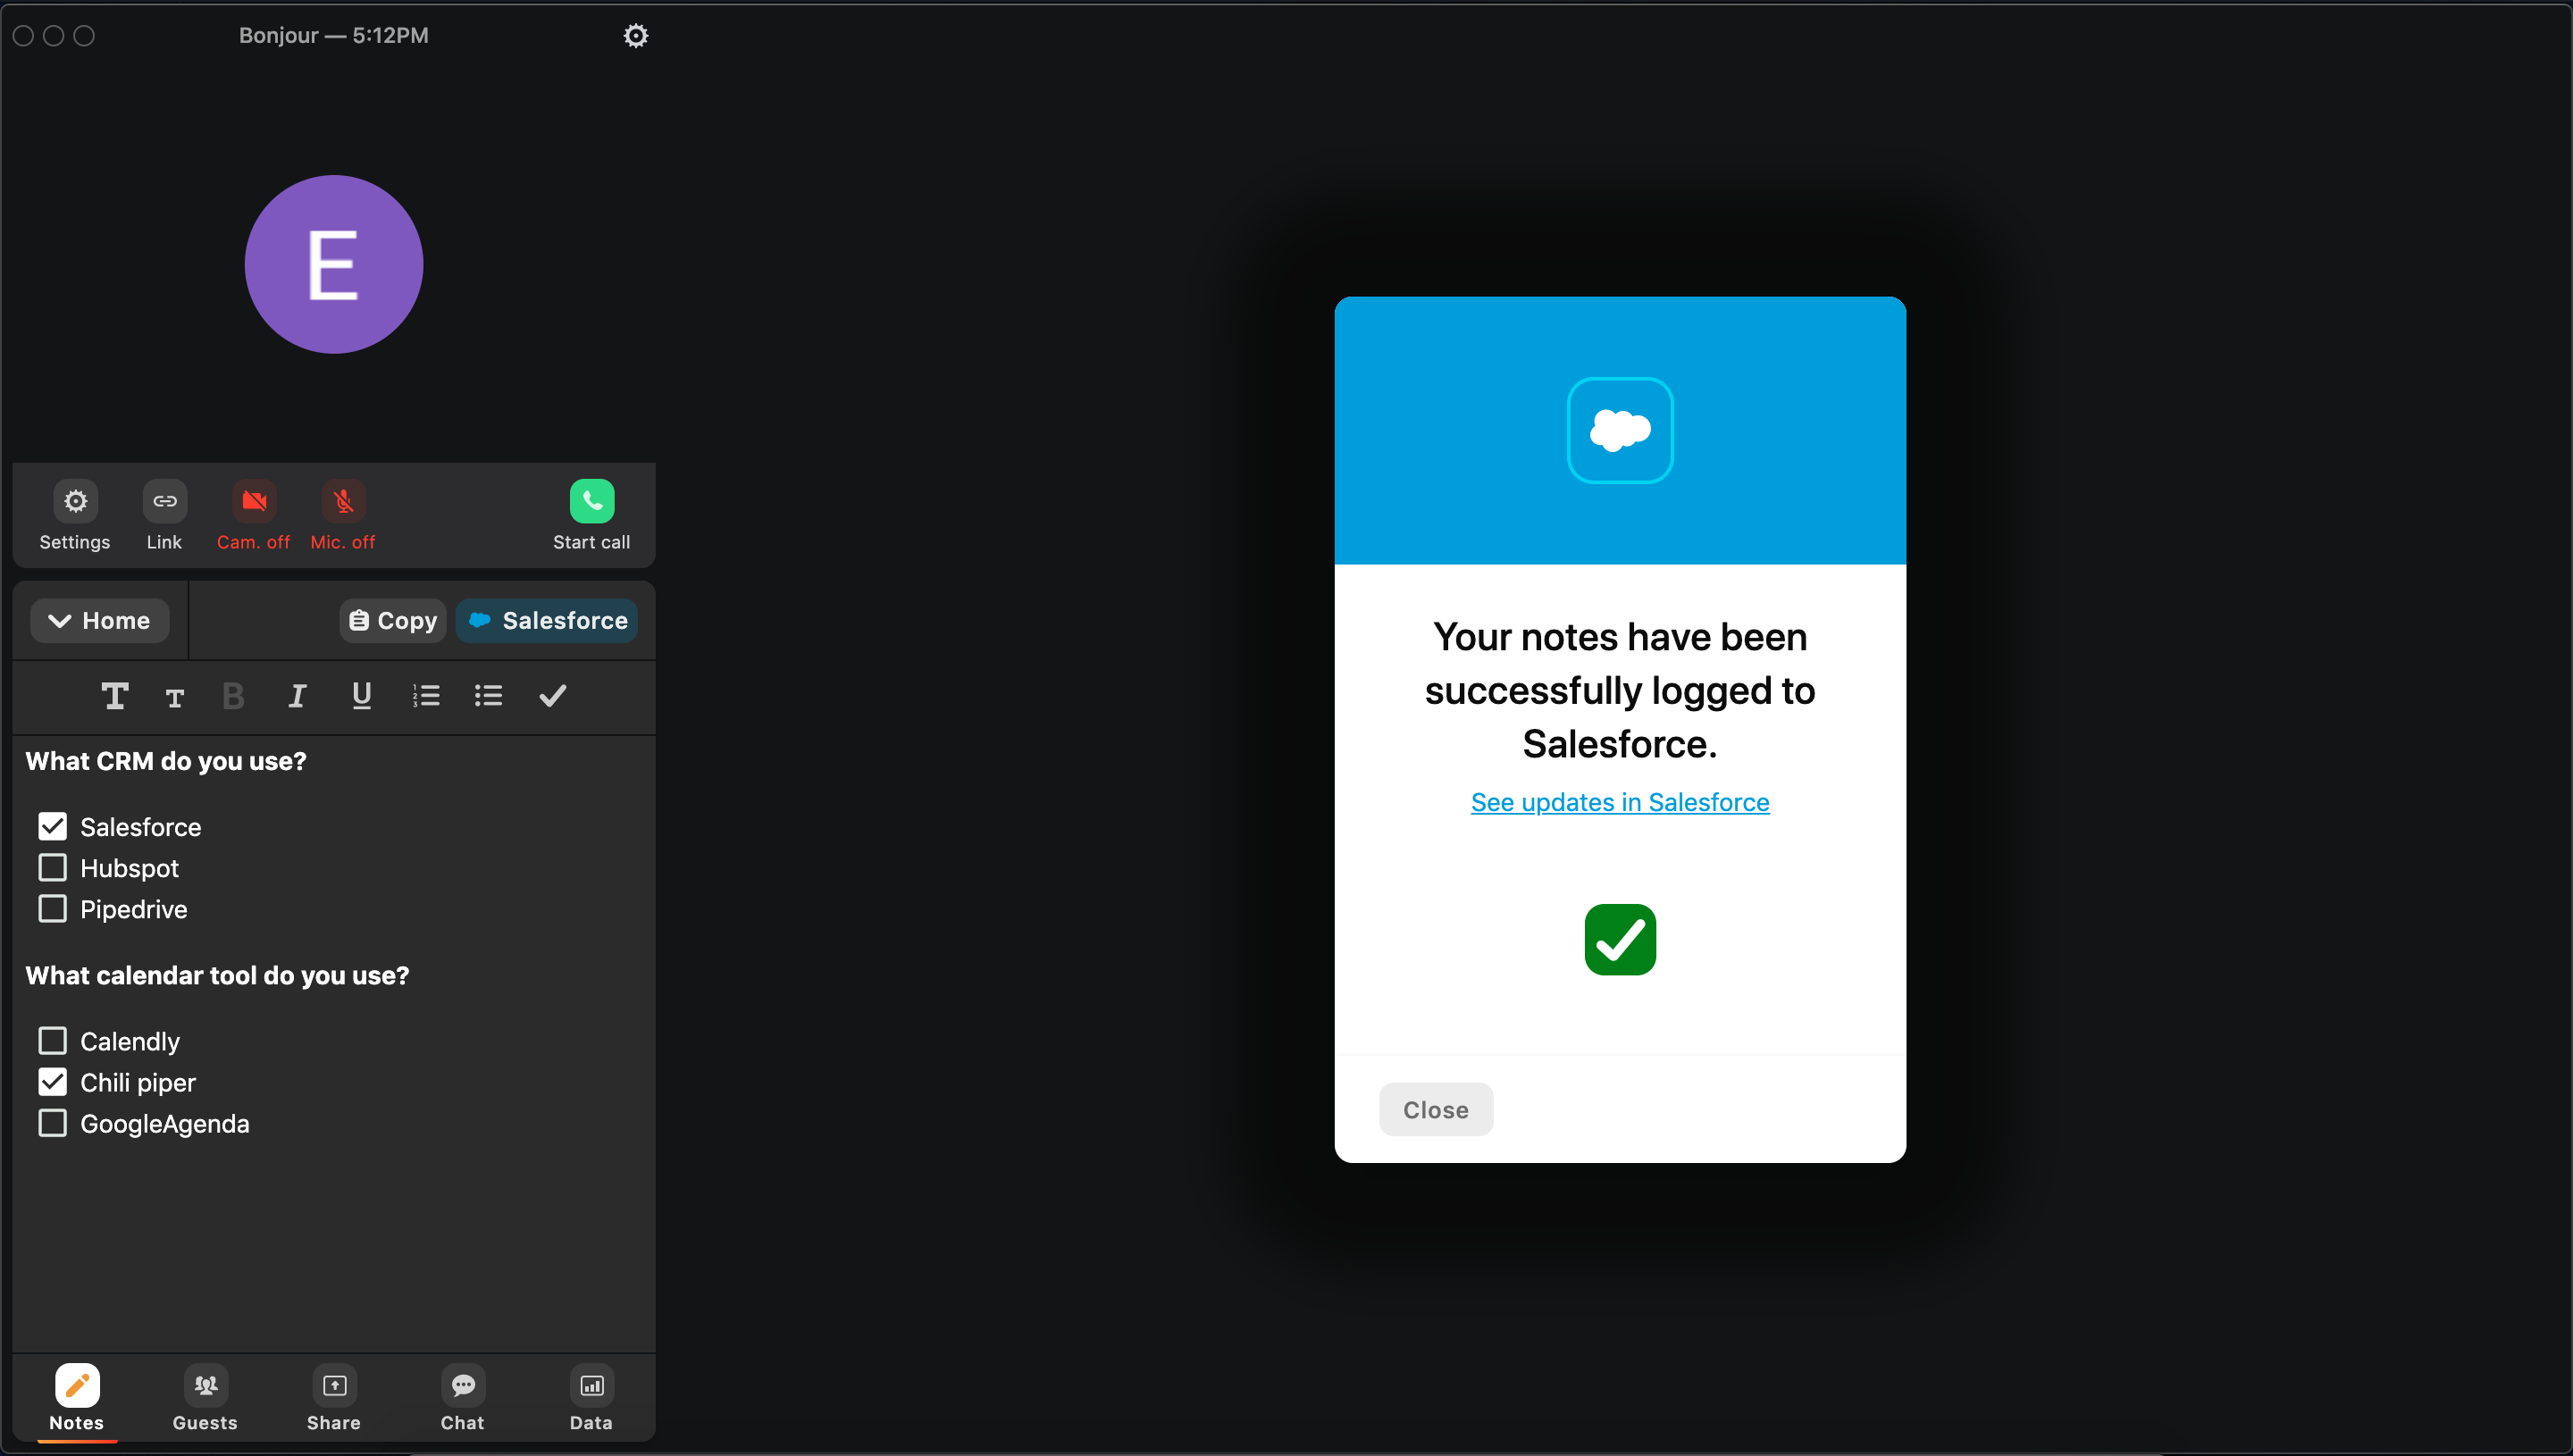

We now can see the exact format of the values to use in Step 5 – Process Builder
-
Step 5: Setup a Process Builder in Salesforce
It’s time to put your “Salesforce-Admin-hat” on. Don’t worry it’s fairly simple, you don’t need to have advanced skills in order to set this process up.
- Go to Setup – Process Builder
- Click on New – Contact Update
- Configure it as follows
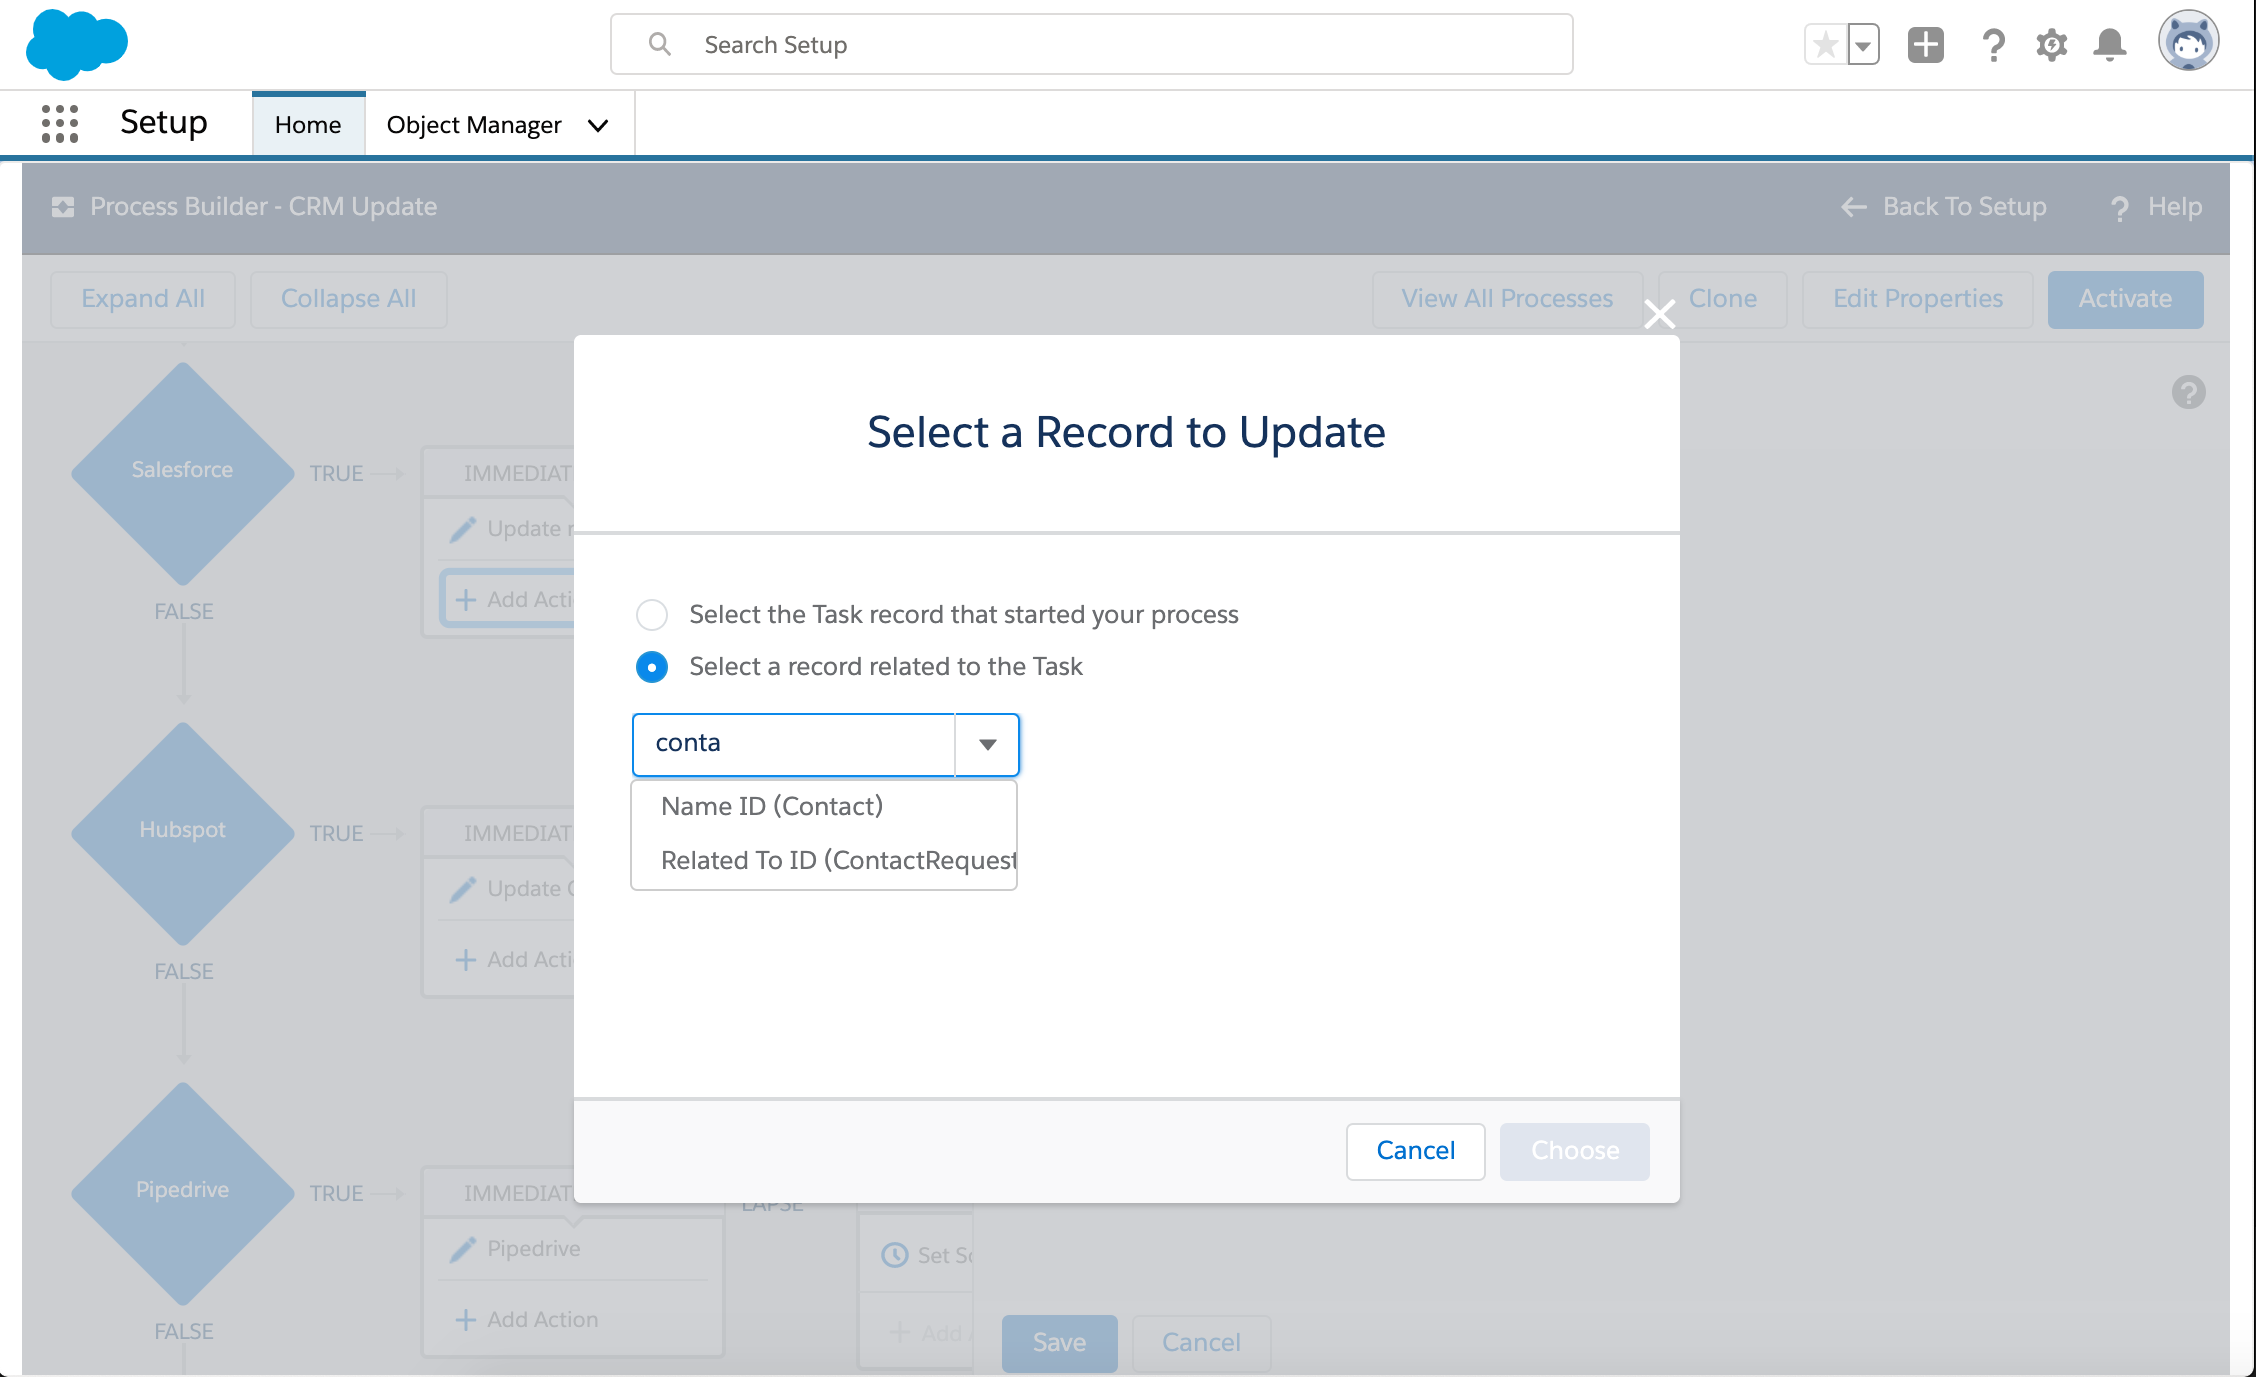
Criteria 1:
Name: Salesforce
Criteria for Executing Actions: Conditions are met
| Field: | Operator: | Type: | Value: |
| [Task].Subject | CONTAINS | String | “Bonjour Call” |
| [Task].Description | CONTAINS | String | “[x] Salesforce” |
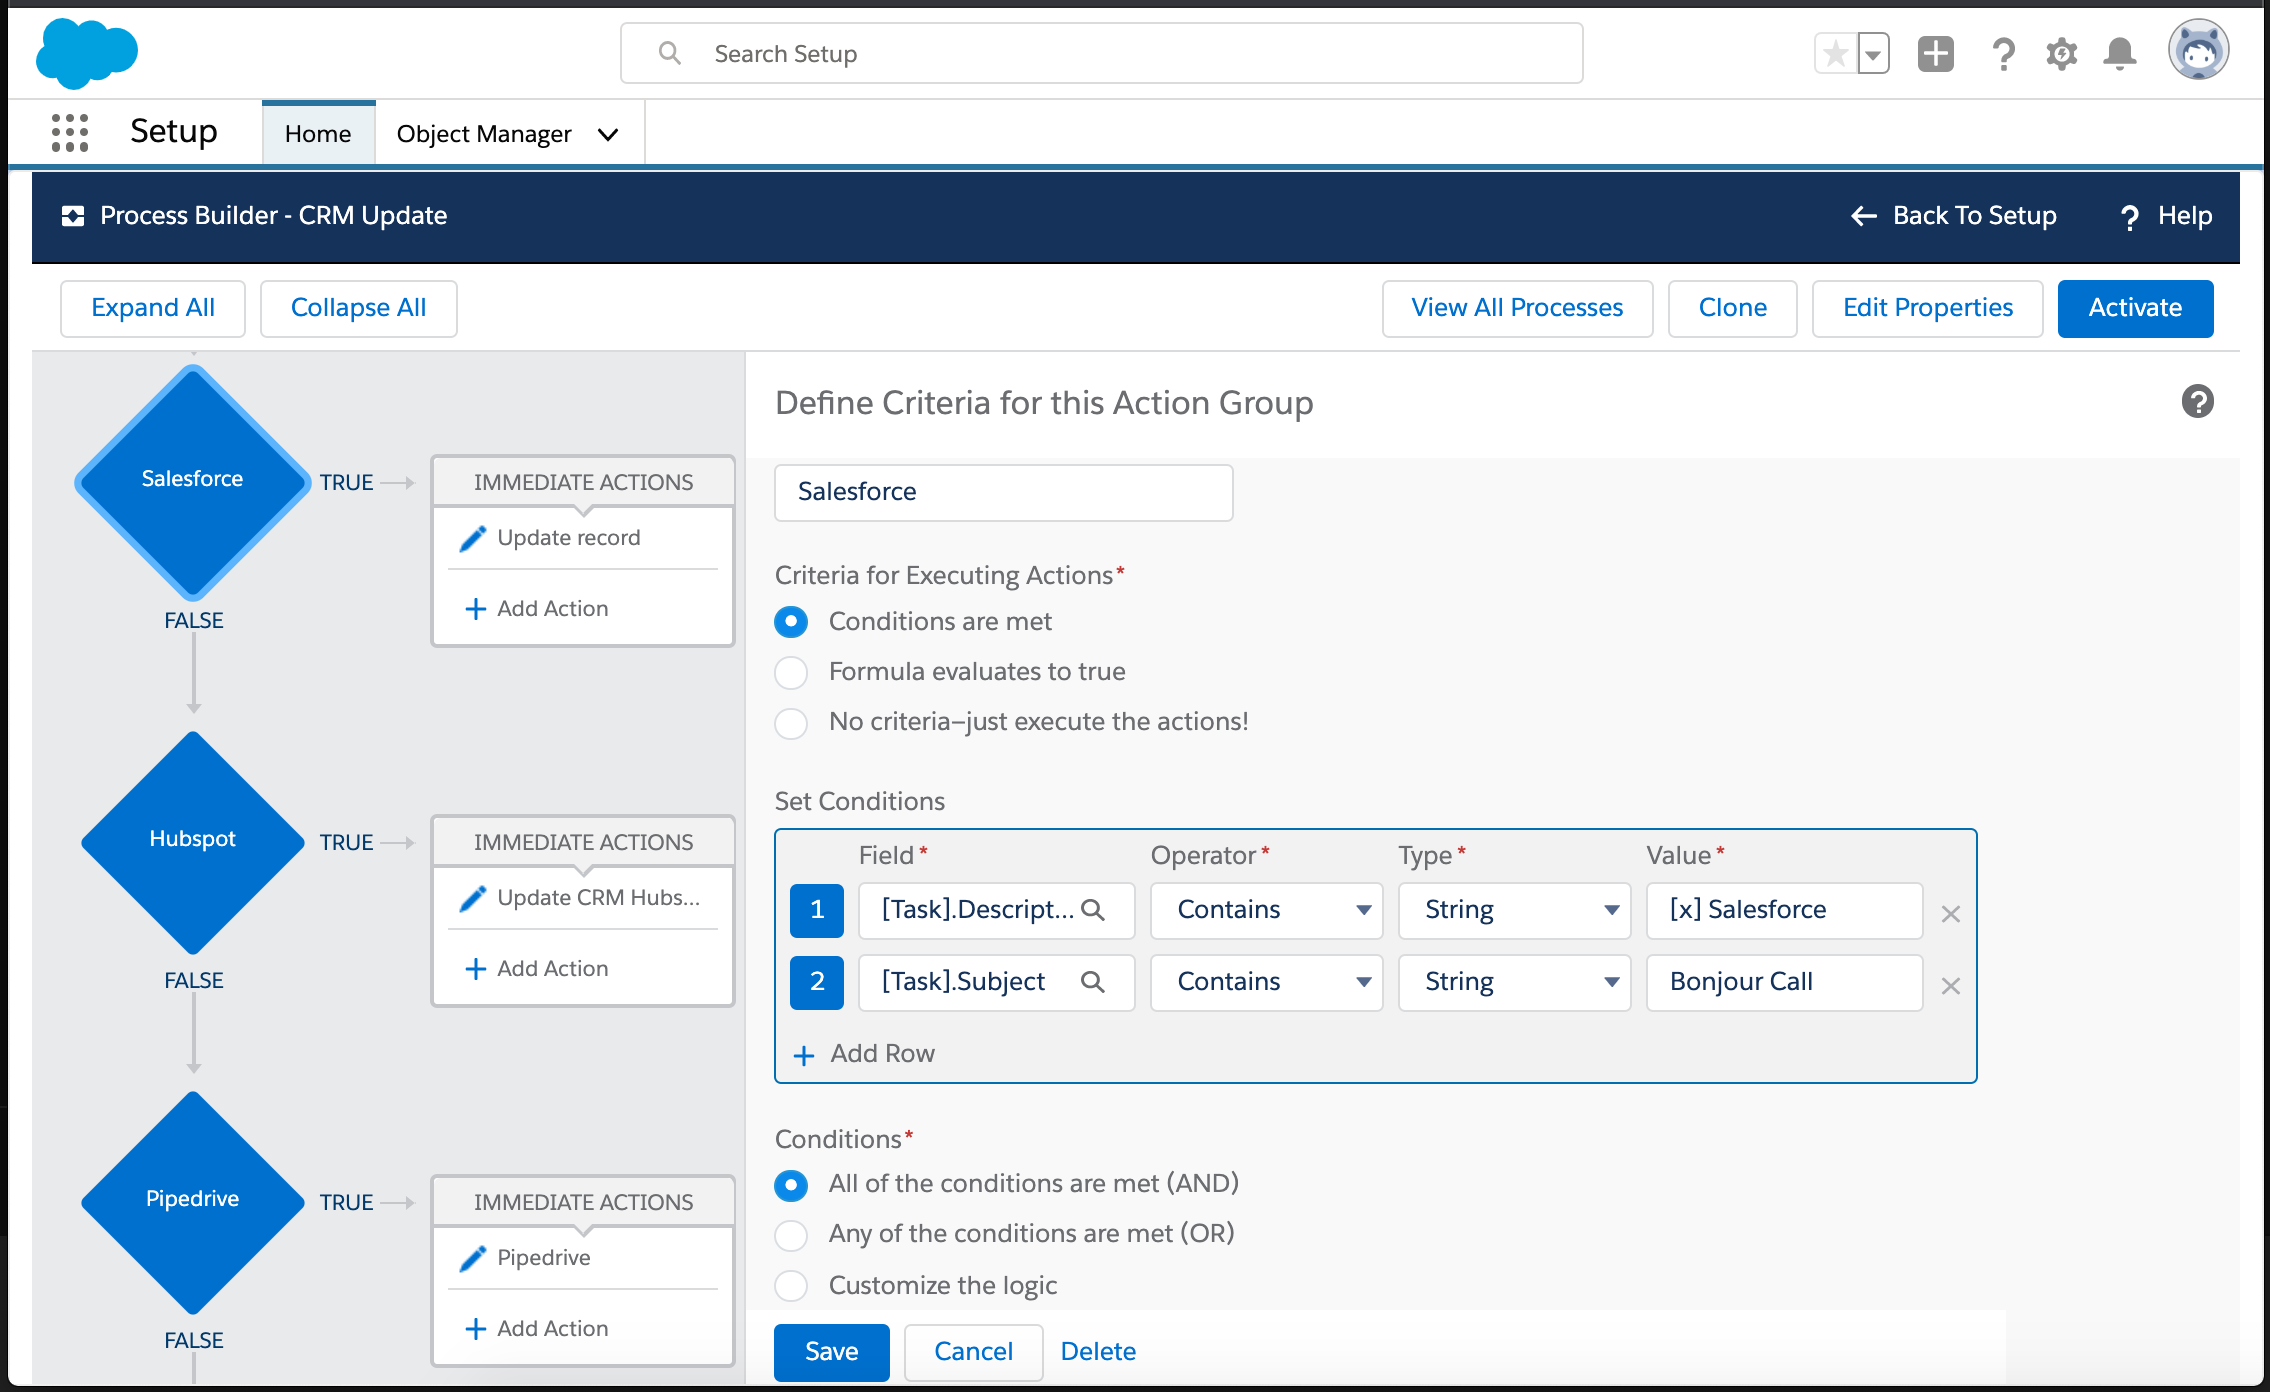
Immediate Actions 1:
Action Type: Update Record
Record Type: Choose a record Related to the Task – NameID (Contact)
Action Name: Choose any
| Field: | Operator: | Value: |
| CRM | Picklist | Salesforce |

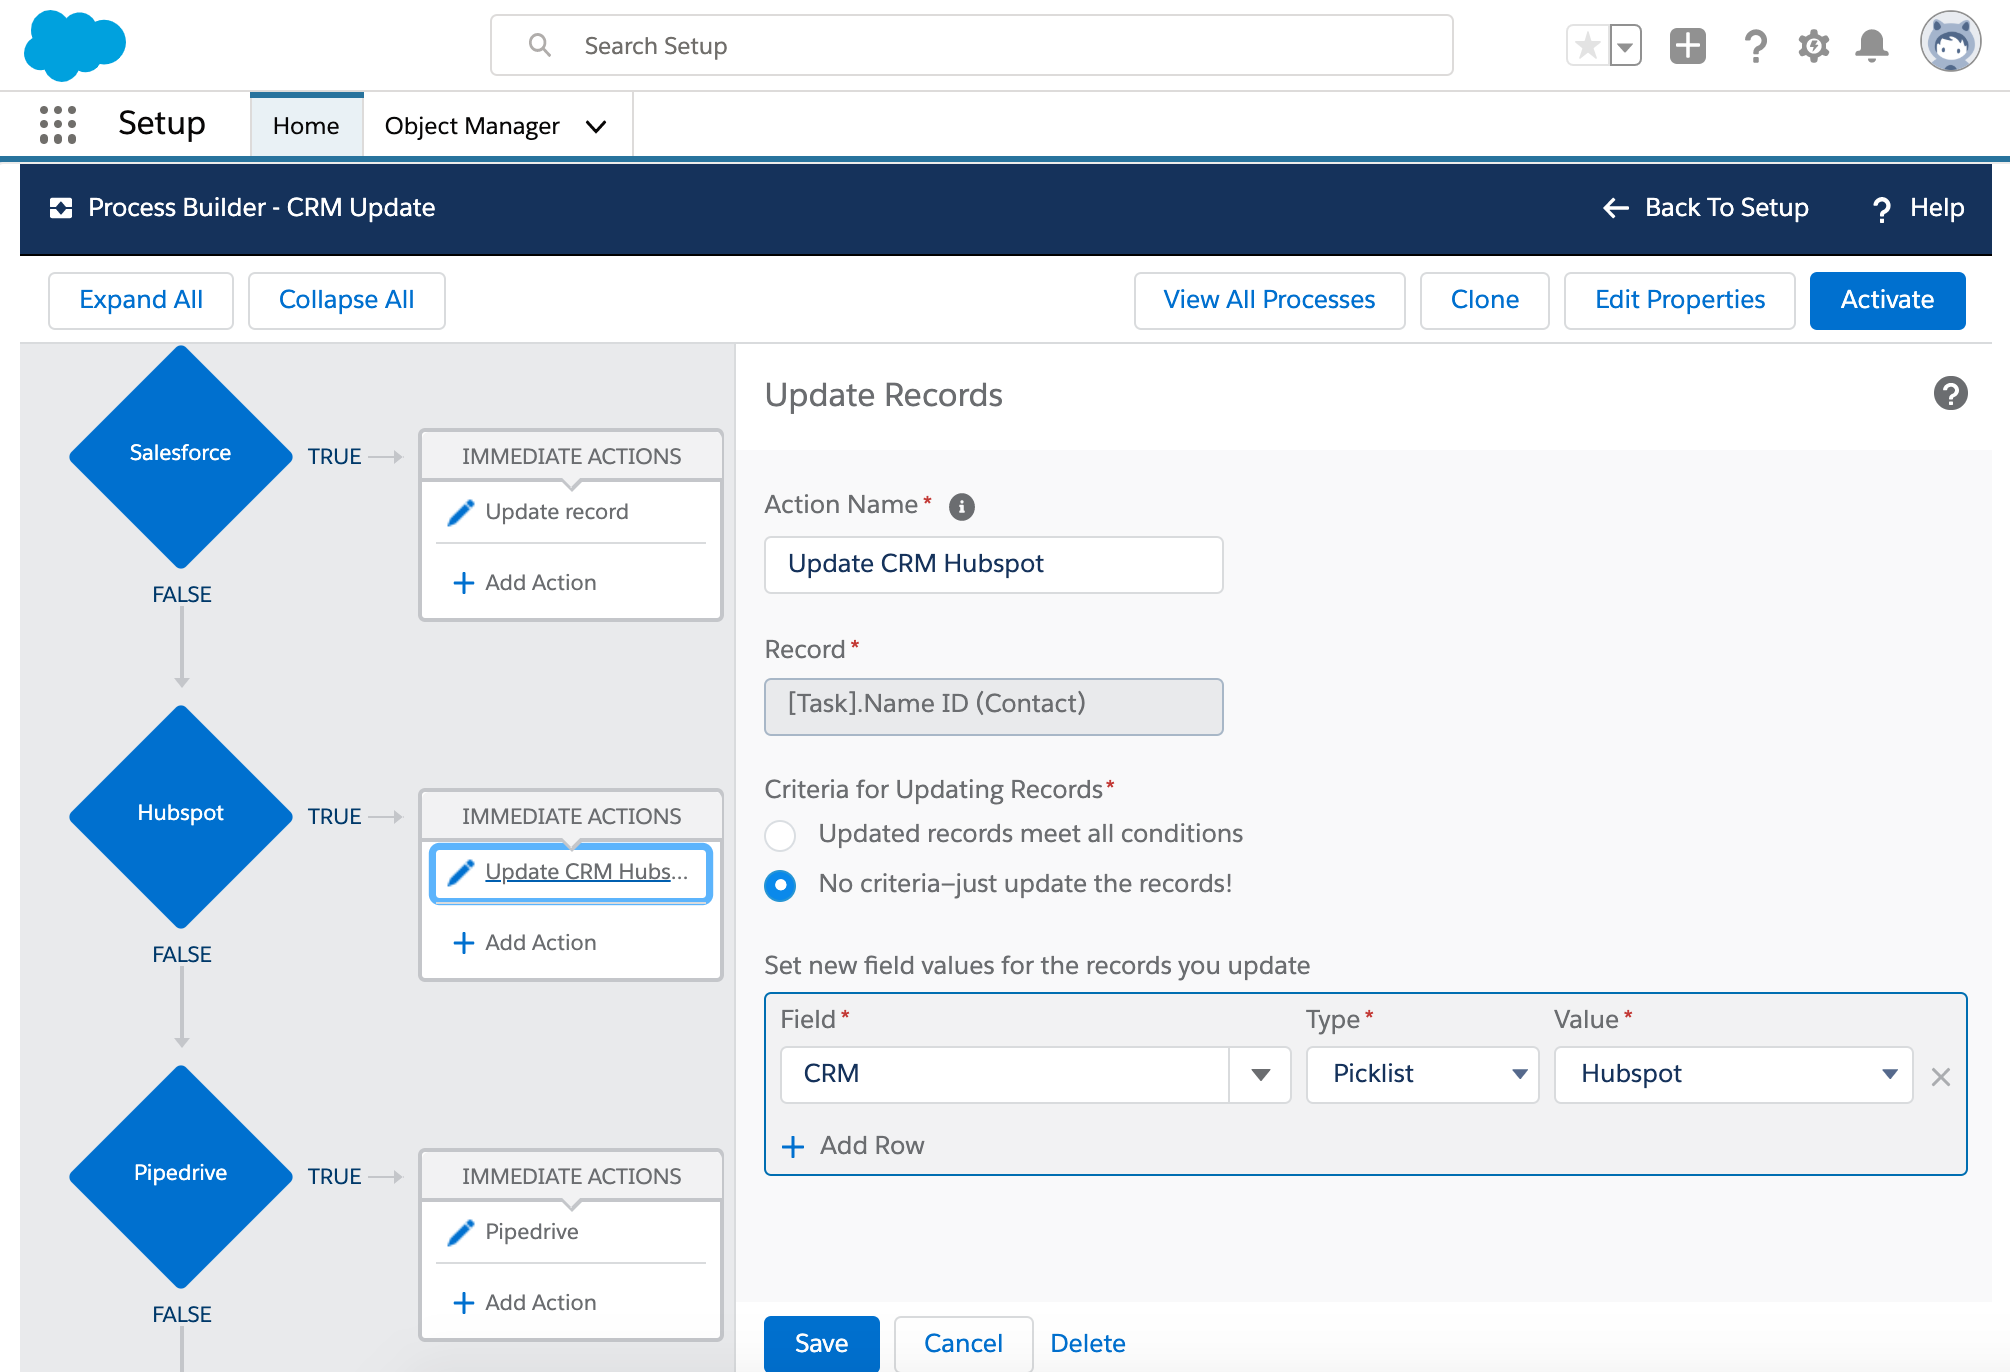
Criteria 2:
Name: Hubspot
Criteria for Executing Actions: Conditions are met
| Field: | Operator: | Type: | Value: |
| [Task].Subject | CONTAINS | String | “Bonjour Call” |
| [Task].Description | CONTAINS | String | “[x] Hubspot” |

Immediate Actions 2:
Action Type: Update Record
Record Type: Choose a record Related to the Task – NameID (Contact)
Action Name: Choose any
| Field: | Operator: | Value: |
| CRM | Picklist | Hubspot |
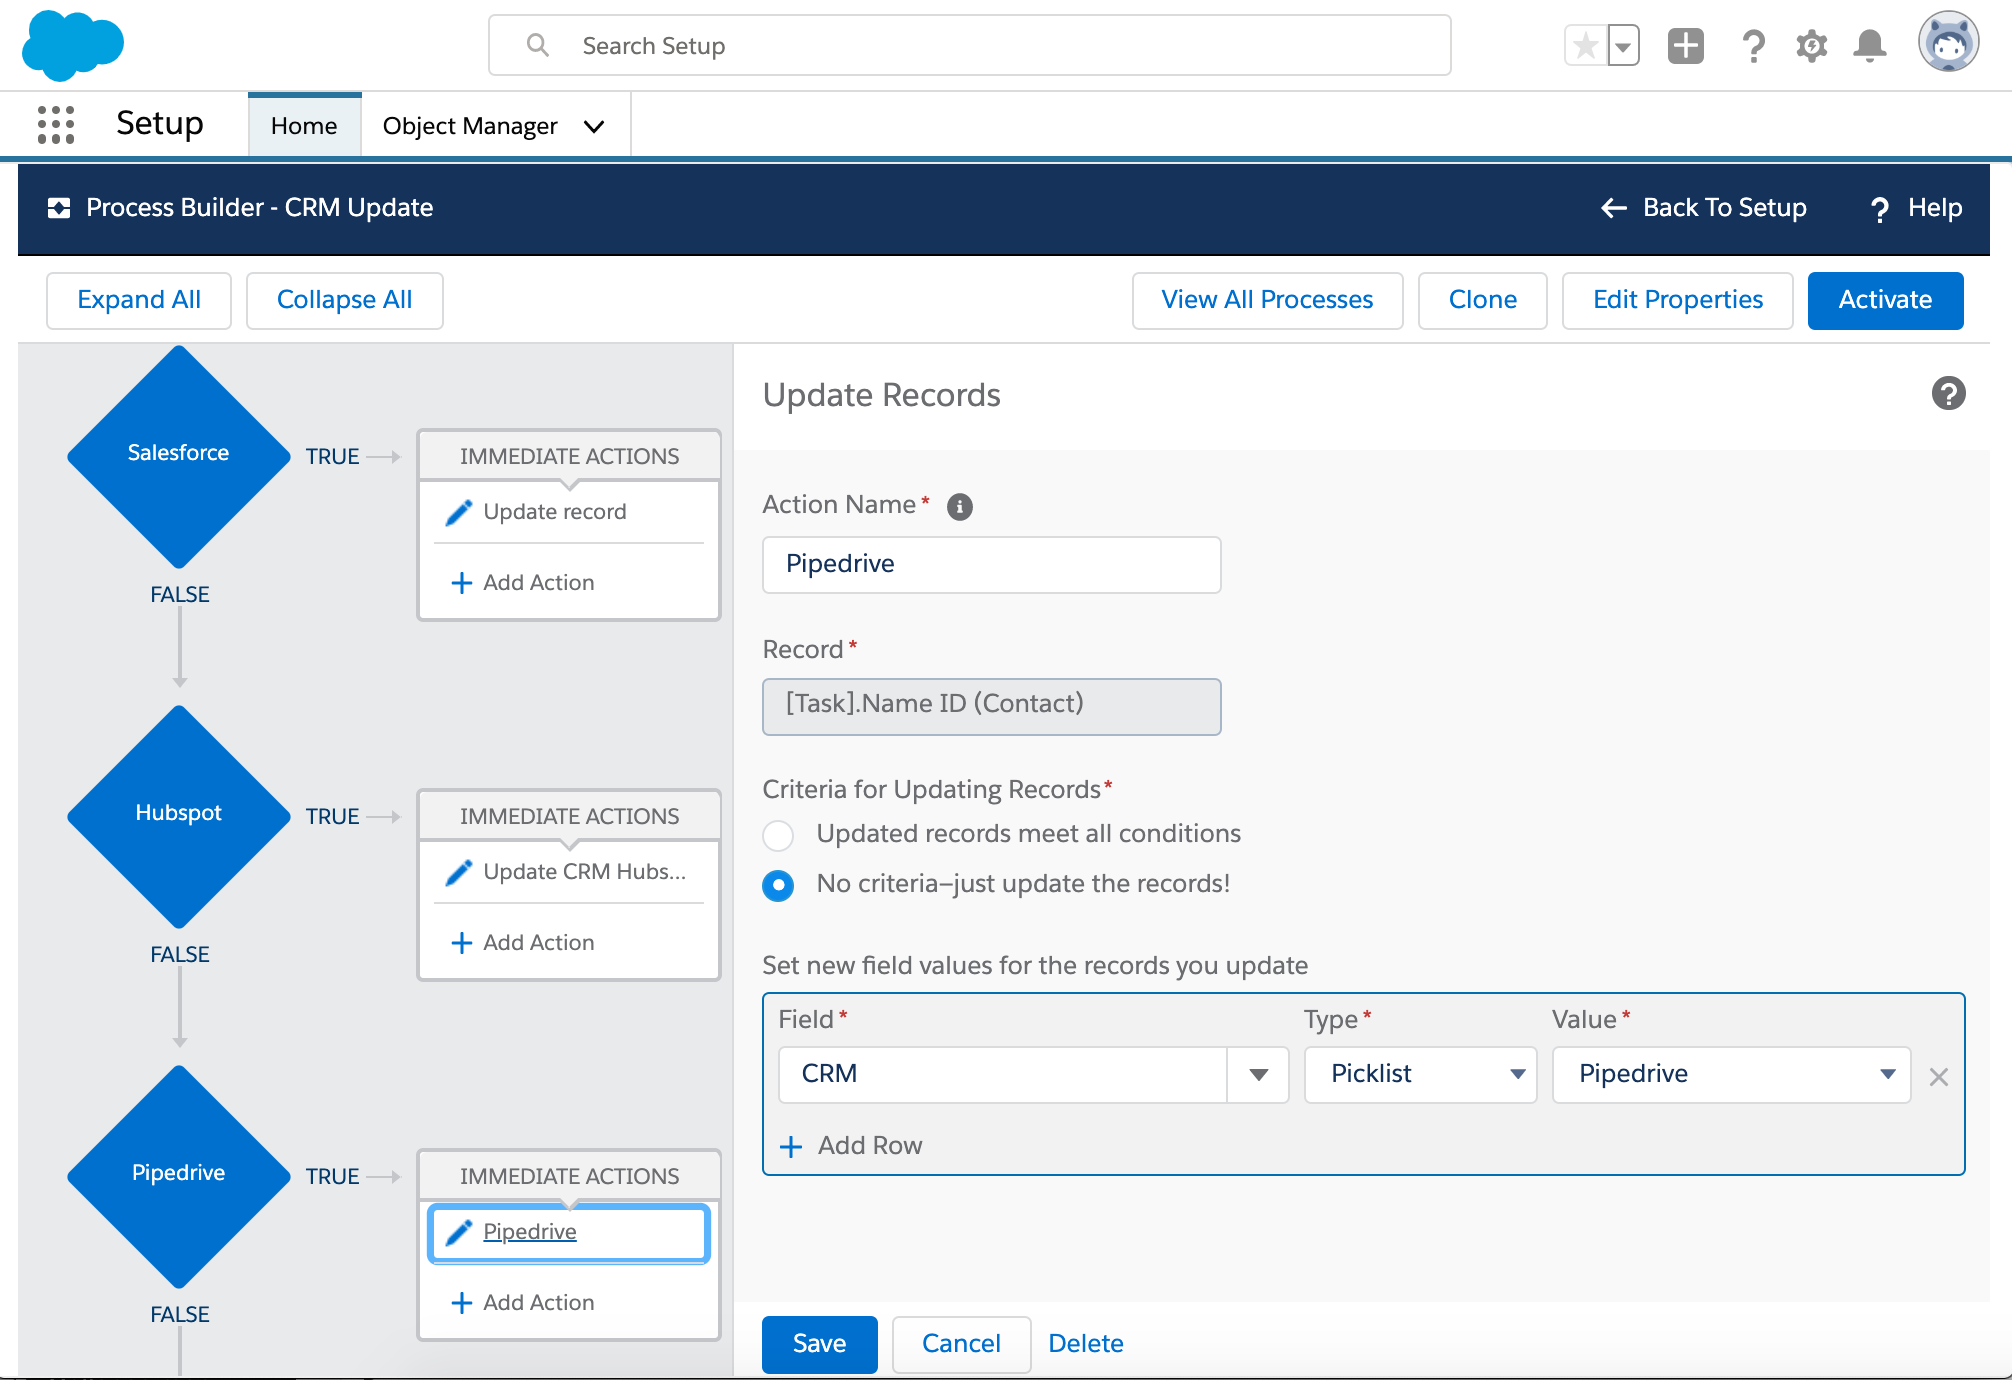
Criteria 3:
Name: Pipedrive
Criteria for Executing Actions: Conditions are met
| Field: | Operator: | Type: | Value: |
| [Task].Subject | CONTAINS | String | “Bonjour Call” |
| [Task].Description | CONTAINS | String | “[x] Pipedrive” |
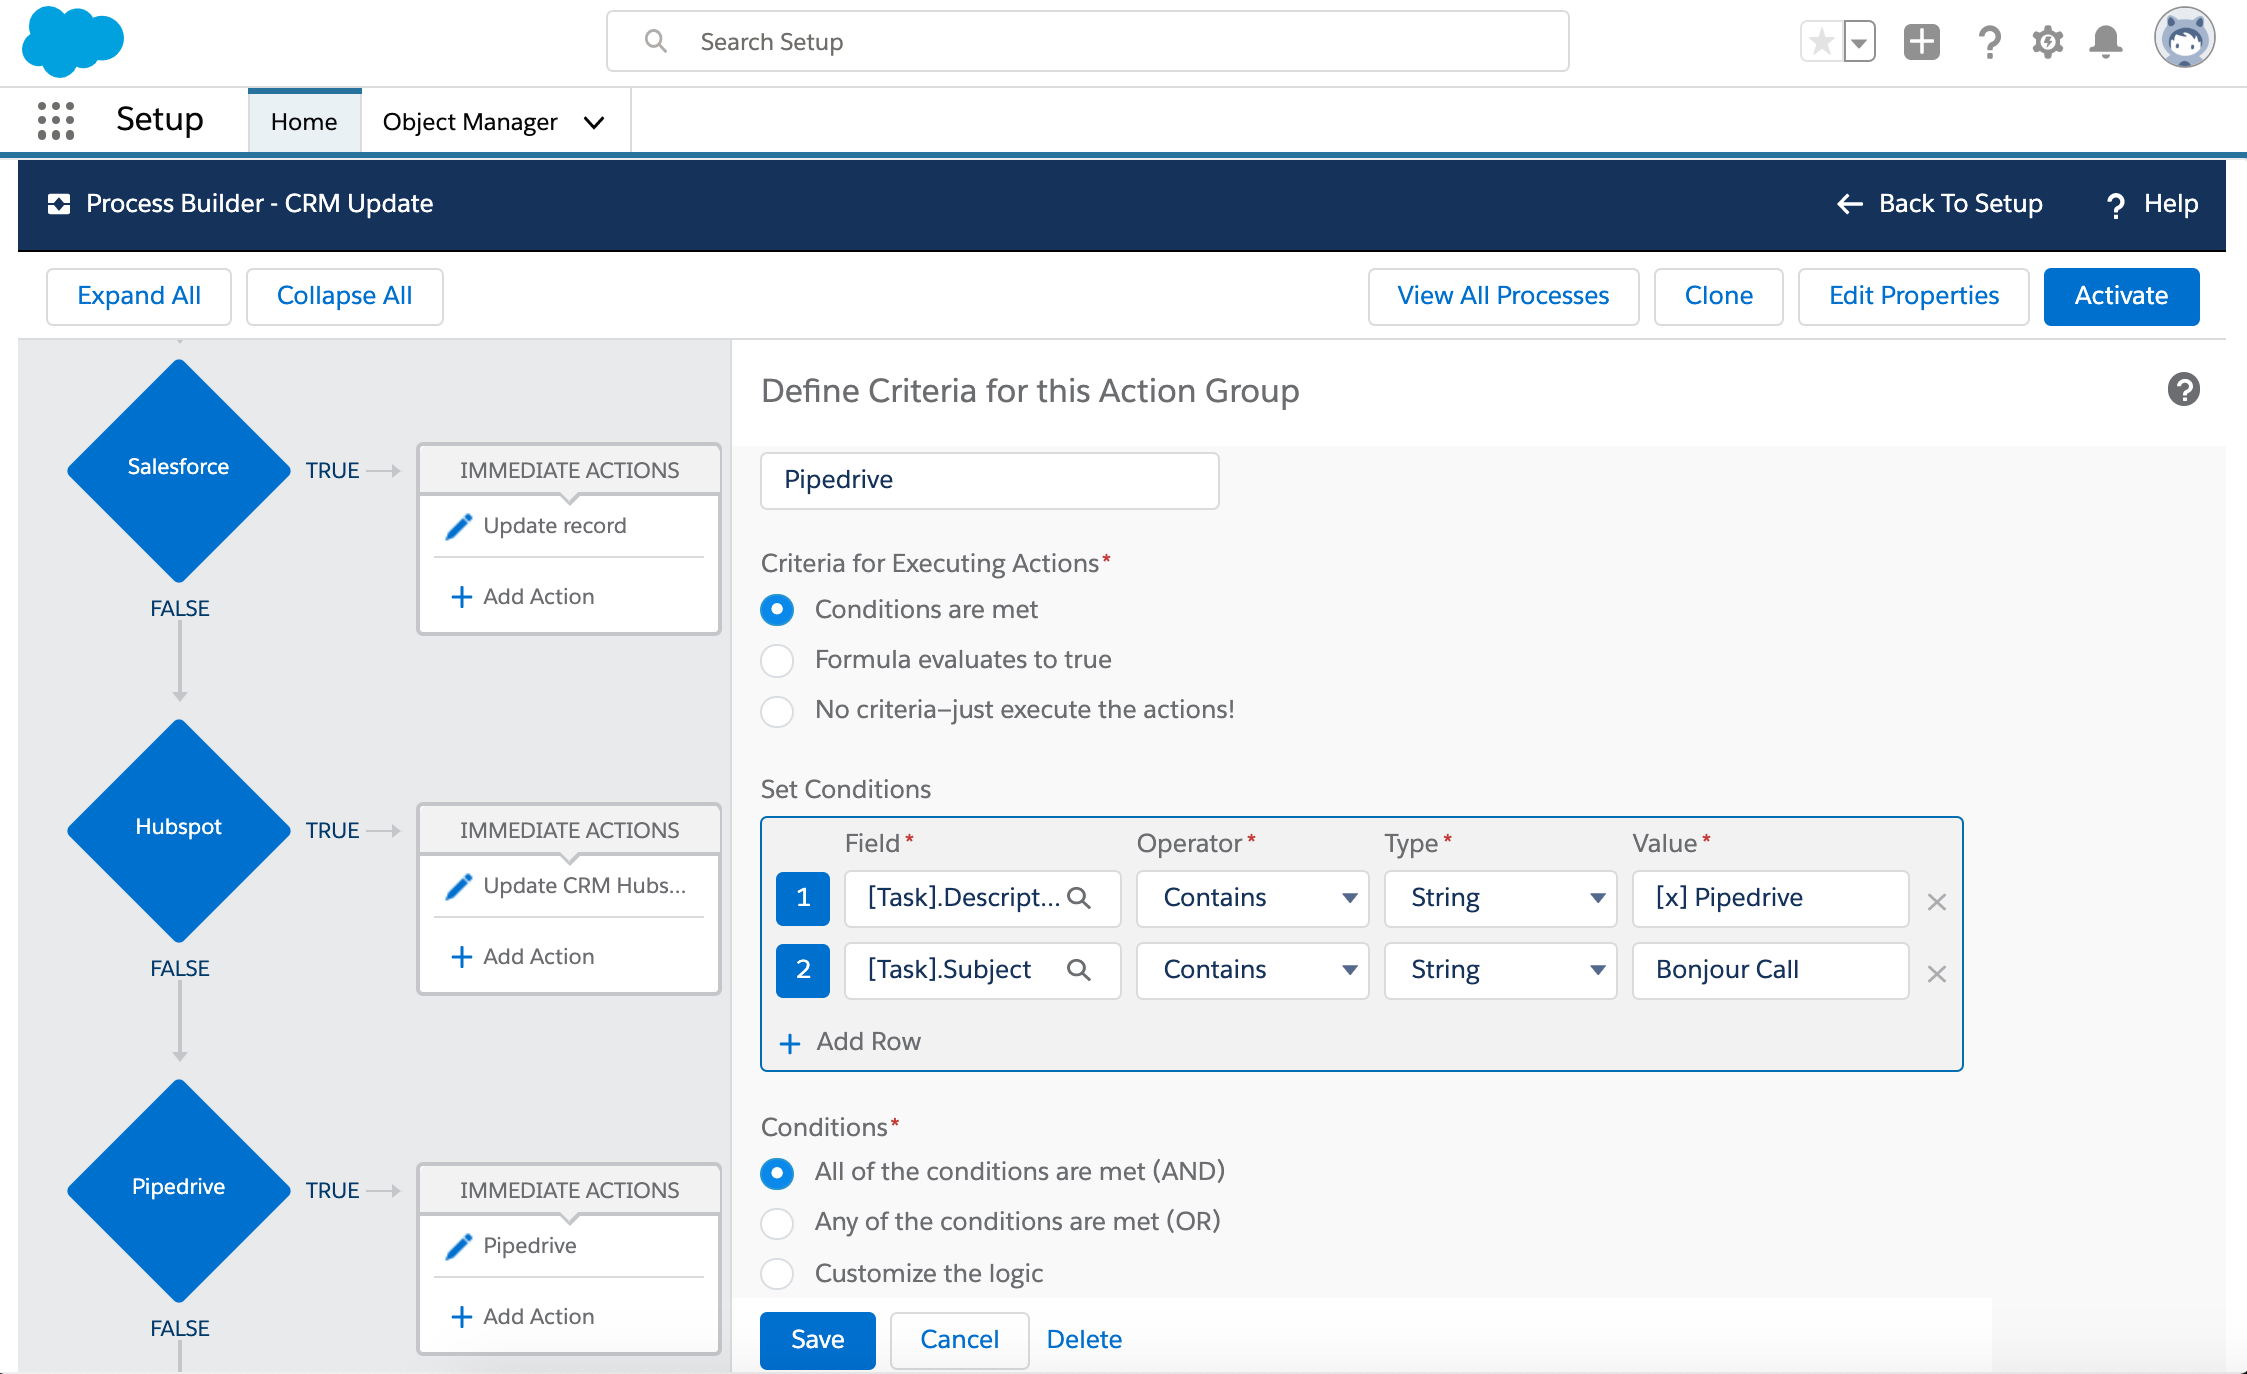
Immediate Actions 3:
Action Type: Update Record
Record Type: Choose a record Related to the Task – NameID (Contact)
Action Name: Choose any
| Field: | Operator: | Value: |
| CRM | Picklist | Pipedrive |
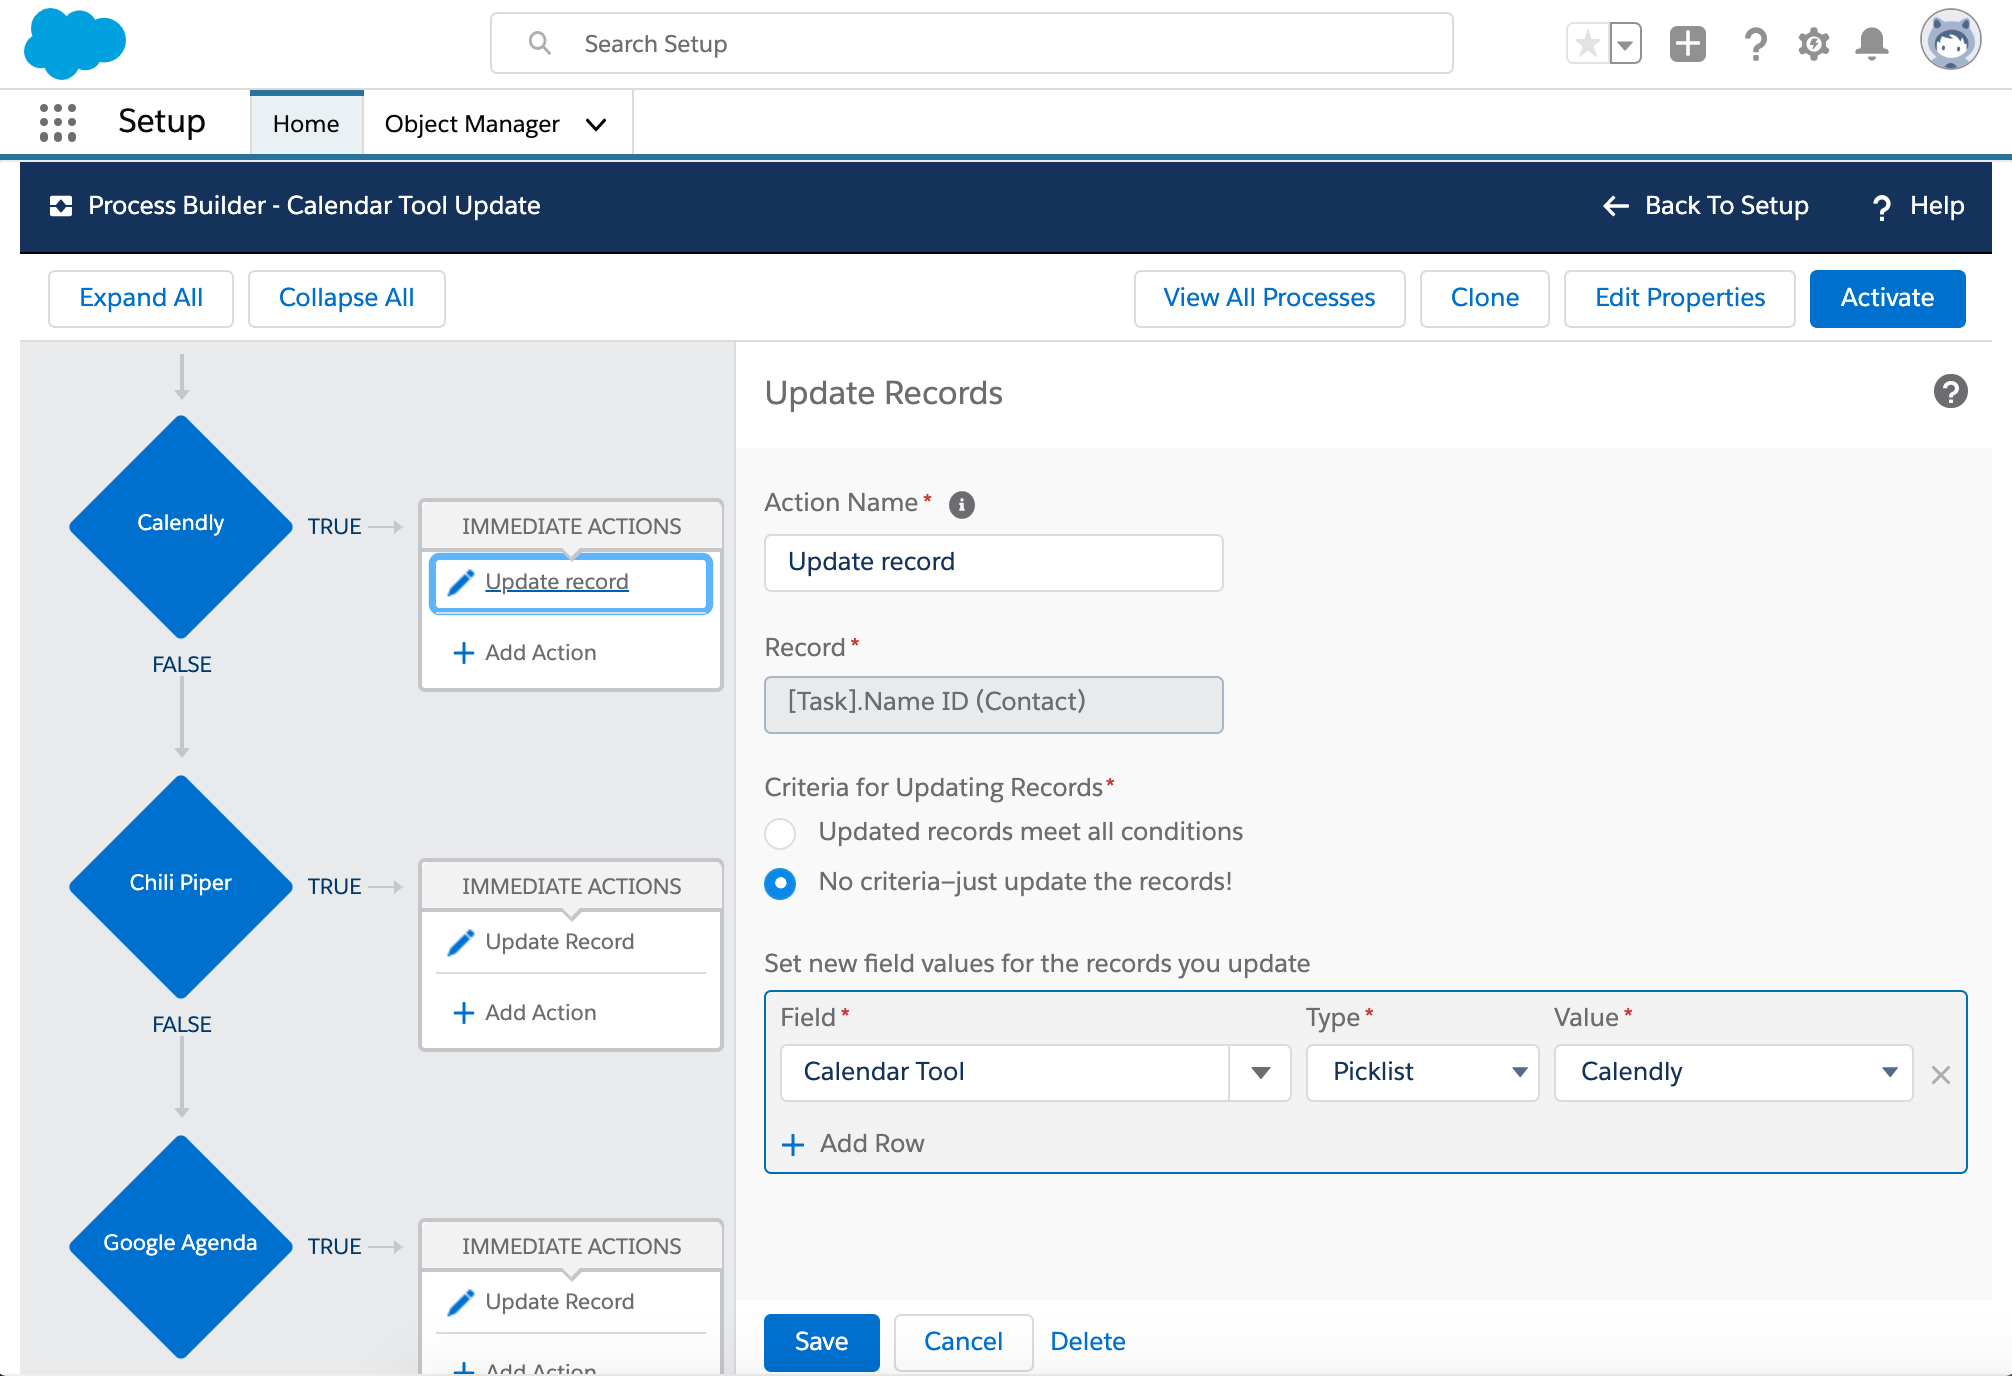
Follow the same logic to update the Calendar Tool:
STEPS TO FOLLOW
- Go to Setup – Process Builder
- Clone the CRM Update Process into a new Process
- Replace the CRM by Calendar tool in all the steps

-
Step 6: Test your automation
Now that all is done, the last thing to do is to test the flow
That’s it! You’re ready to fly 😉 Bon Voyage into the next level of Sales Performance!
Properties:
The process name: Contact Update
The process starts when: a record changes
Object:
Object: Task (Bonjour.io used Log a Call which is a Task object inside Salesforce)
Start the process: when a record is created (as we only want this automation to be launched when we log a call from Bonjour.io and avoid for it to trigger if we then update it manually)